Guide complet pour les solutions encastrables de Hue
Philips Hue offers four recessed products designed to give you flexible and intelligent control of your lighting setup. While they may look similar, each one works differently depending on the type of lighting you have and the wiring available in your home.
This guide introduces the four products, compares them, and provides you with details about how to install, compatibility, and troubleshoot.
1. Smart lighting modules (two versions)
These modules work with Philips Hue and other Zigbee smart lights and allow you to control them using your existing wall switch without turning off the power to the bulbs.
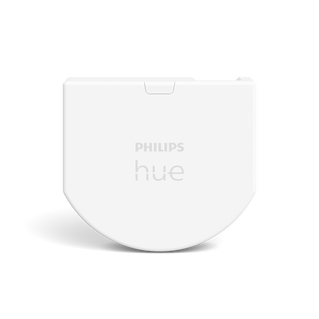
1A. Wired wall switch module (wired version)
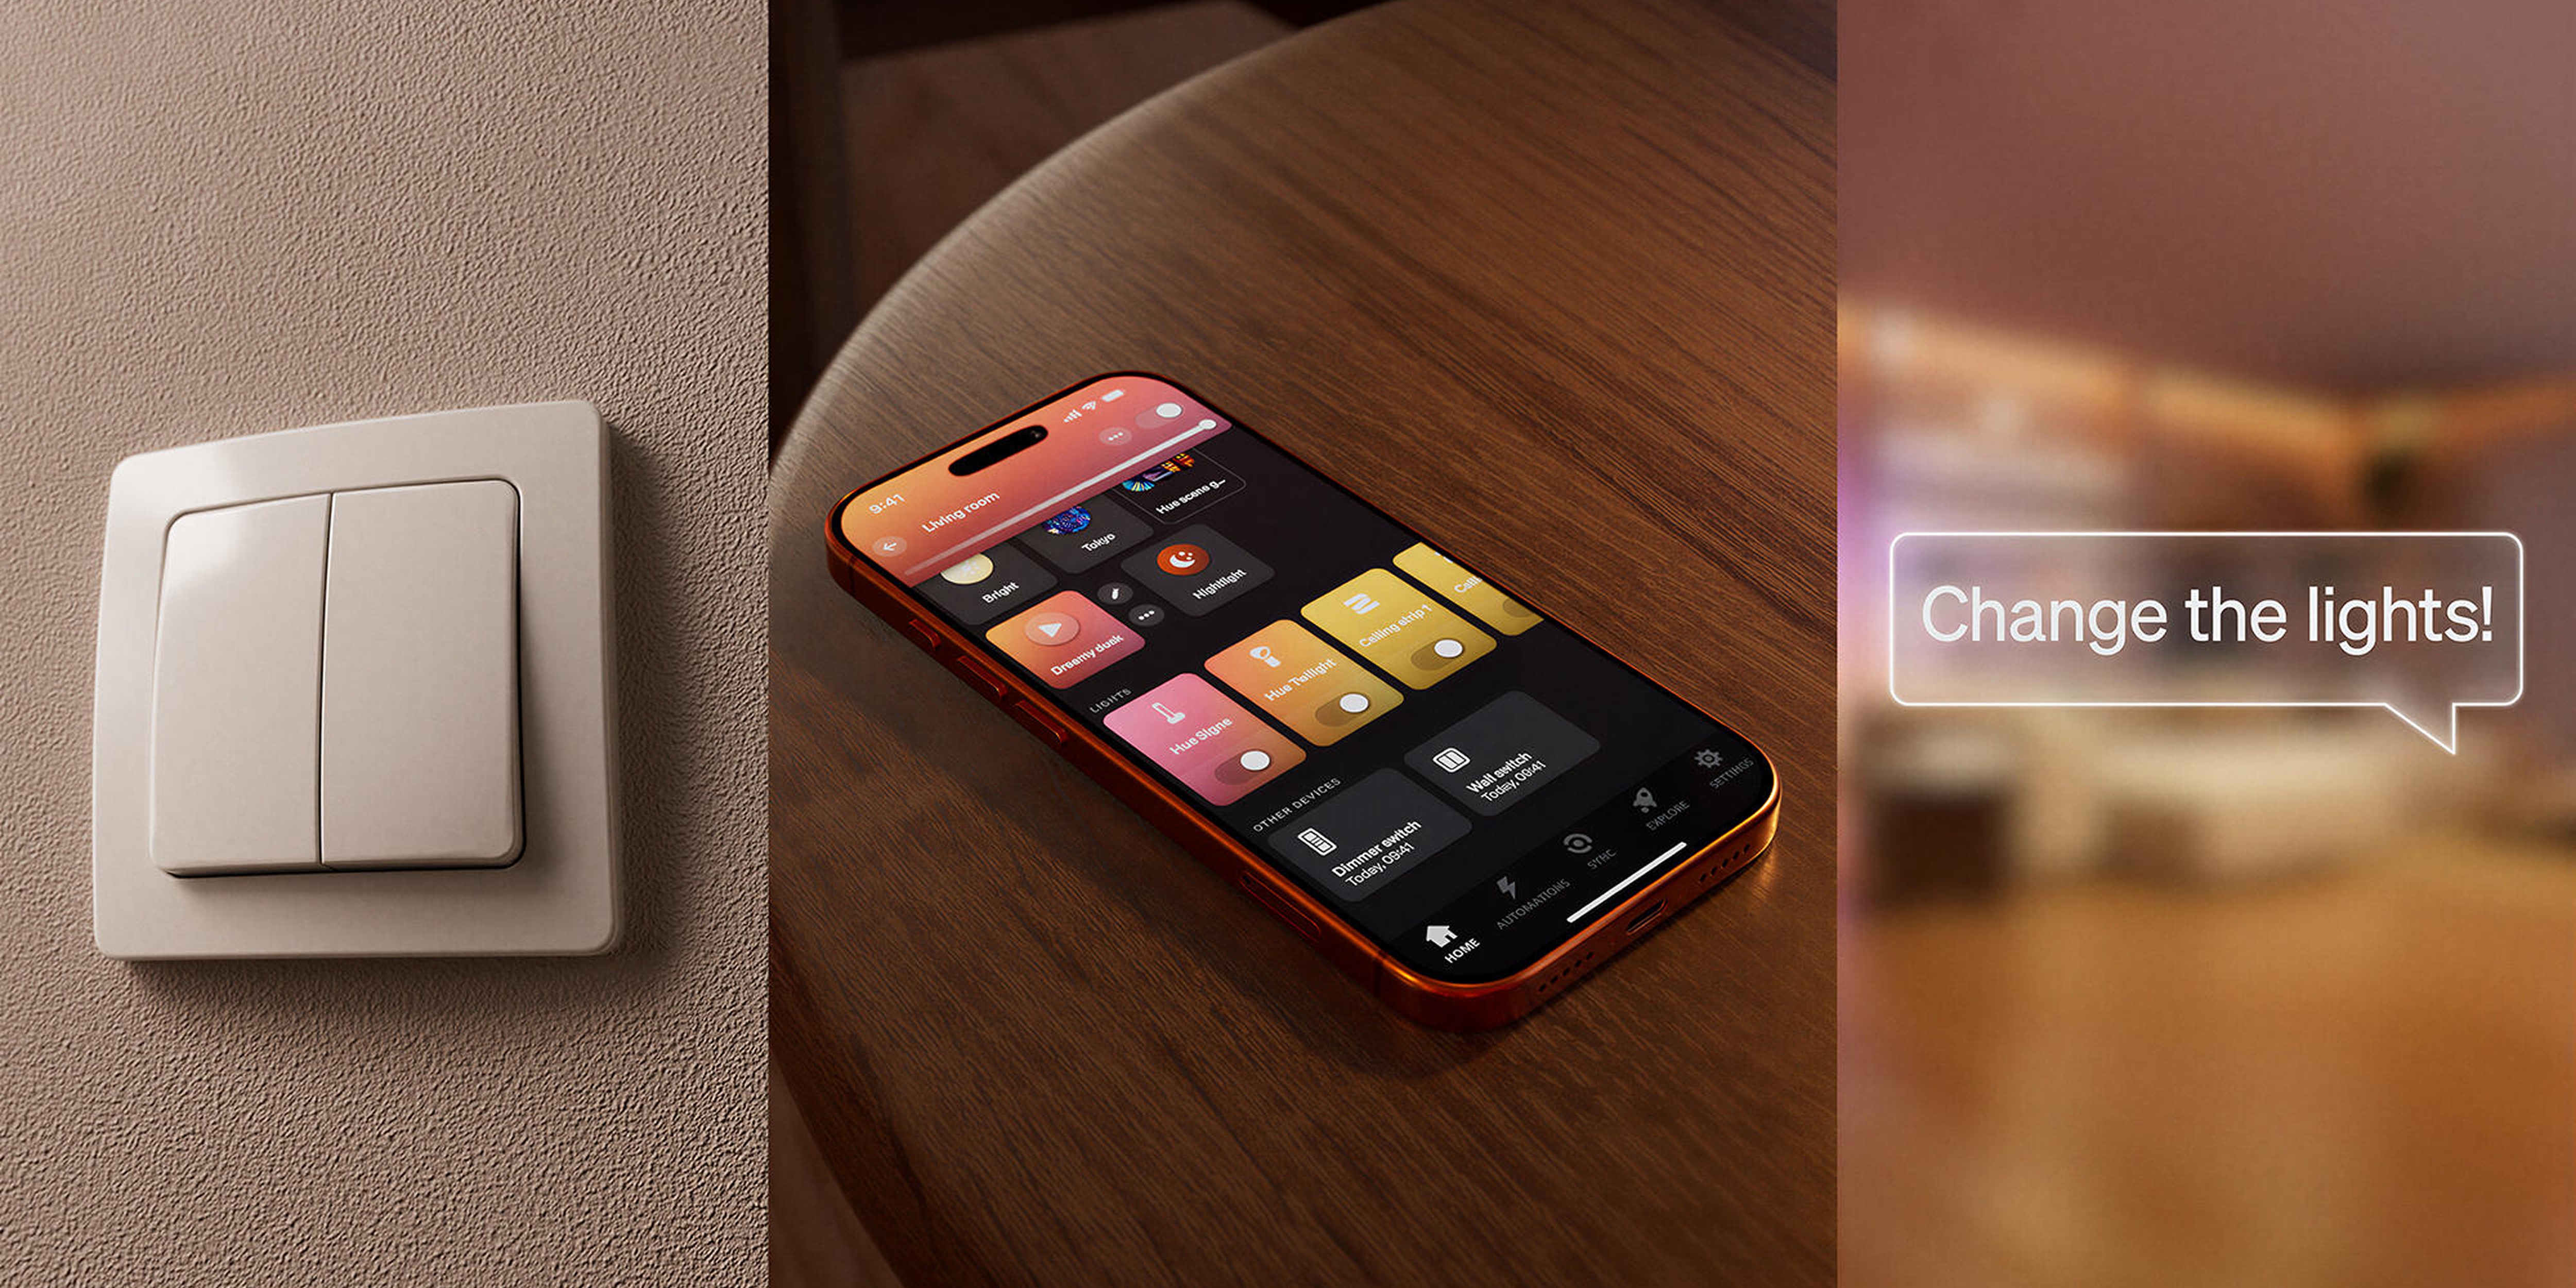
Keep Hue lights accessible. Make your existing wall switch smart so it can control Hue lighting scenes, rooms/zones, and automations while continuously powering the smart bulbs.
Key features
- Works with Hue and other compatible Zigbee smart lights
- Requires a Hue Bridge
- Works with cradle, toggle, and push-button switches
- Install once, no need to replace the battery
- Requires a neutral wire
Compatibility Notes
Not compatible with:
- Existing rotary drives
- Combination Socket and Light Switch Plates
- Non-smart lights
Facility Highlights
- Requires wiring in your wall box:
o 1-2 charging cables (depending on whether it is a one-button or two-button switch)
o Neutral cable
o 2 line cables
- 5-terminal plug-in connector included in the enclosure to keep the mains connected
The appropriate wire size and strip length for the supplied splice connector:
- Conductor cross-section: solid: 0.75 to 4 mm².
- Stripped conductor length: 11 mm
- Track the integration in the Hue app
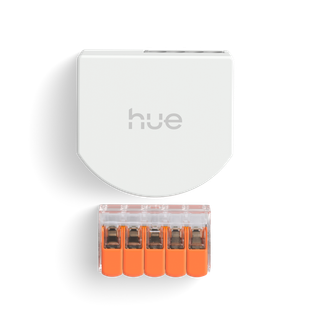
1B. Battery Powered Wall Switch Module (Battery Version)
Offers the same smart lighting control benefits as the wired version without the need for a neutral cable.
Key features
- Battery powered (no wiring required), CR2450 battery type
- Works with Hue and other Zigbee smart lights
- Requires a Hue Bridge
- Battery life: at least 5 years (low battery alert displayed in the Hue app)
Compatibility Notes
- Works with cradle, toggle, and push-button switches
- Not compatible with integrated dimmer switches or combo plug/switch plates.
- Works with both 2-way and 3-way switches (if the other switches are also connected to the modules)
Facility Highlights
- Neutral wiring is not required (compatible with the wiring in your wall)
- Always turn off the circuit breaker before performing any electrical work, including removing the switch
- Use the included plug-in connector to maintain power to the smart bulbs
- Do not extend the supplied wires.
- The module may flash if the cables touch each other during installation – this is normal
- Complete the physical installation before adding it to the Hue app
2. Hardwired switch (two versions On/Off or dimmer) – for non-smart lights
A product designed for traditional light bulbs, turning them into smart lights that can be controlled in the Hue ecosystem.
Adds smart on/off control or dimmer switch to non-smart lights.
Key features
- On/Off version → for dimmable lights
- Dimmer version→ for dimmable lights
- Bluetooth support (limited, see here)
- Compatible with Matter (as a)
- Available in 1 or 2 channel versions (on/off only):
The 1-channel version is used to control a group of lights (single switch), while the 2-channel version is used to control 2 groups of lights independently (double switch), either through the switch itself or through the Hue app. For example, on a dual switch, one switch controls your lights in the living room, while the other controls the lights in your dining room. The wired dimmer is currently available for 1 channel.
Compatibility Notes
Not intended for:
- Mix different types of load on the same wired switch.
- Rotary dimmer mechanisms
Cabling required
- On/Off switch → requires a neutral cable
- Dimming → works with or without neutral (neutral preferably / Wireless-neutral, the light is less bright, and some LED bulbs may not work properly, so a bypass capacitor may be required).
Dimming behavior
- Cradle Switch→ You cannot dim your lights in the traditional way. However, you can adjust the brightness through the Hue app and set the scenes to have different brightness levels. This means you can dim the lighting by flipping the switch to switch to other scenes.
- → Push Button supports long-press dimming.
- Works only with dimmable bulbs
Facility Highlights
- No push-in connectors required
- On/off switch (1 channel) / dimmer switch (1 channel)
o 1 charging cable
o 1 neutral cable
· 1 on/off line cable (2 channels)
o 2 charging cables
o 1 neutral cable
o 1 line cable
The appropriate wire gauge and strip length for terminal blocks:
· Conductor cross-section: Fixed: 0.75 to 2.5 mm²
- Stripped conductor length: 9 ... 10 mm
3. Comparison Overview
Battery Powered Wall Switch Module (Smart Lights) | Hardwired Wall Switch Module (Smart Lights) | Hardwired Wall Switch Module (Non-Smart Lights) | |
|
|
|
|
Supported Lights | Hue and other Zigbee smart lights | Hue and other Zigbee smart lights | Traditional lights* |
Bridge is required | Yes | Yes | No. (Limited functionality without a Bridge. Check here) |
Wiring | No neutral wire required | Hardwired, neutral wire required
| Wired on/off: neutral wire required Hardwired dimmer: works with or without a neutral cable (neutral preferred) |
Power Source | Battery (5+ years) | Industry | Industry |
Switch Compatibility | Cradle switch, toggle, push button | ||
Scene change | Switch cycles through up to 3 assigned scenes at 3-second intervals | ||
Dimming | Long press the push button; Scenes | Long press the push button; Scenes | Depends on the version + type of bulb |
Matter support | No, only via the Bridge | No, only via the Bridge | Yes (as light) |
Bluetooth | No | No | Yes (limited) |
Channels | Not applicable | Not applicable | 1 or 2 channels (on/off), 1 channel (dimmer) |
Dimensions | 43 × 38 × 10 mm | 41 × 37 × 15 mm | 41 × 37 × 17 mm |
Explainer video | |||
Installation Guide | |||
Application Notes for Installers | |||
Charging Requirements:
* The on/off switch module is compatible with:
· LED light sources (up to 400 W)
- Incandescent lamps (up to 6A)
- Fluorescent lamps (up to 6A)
- Electronic step-down converter for ultra-low voltage incandescent lamps (up to 6A)
And cannot be used with motors or heating systems.
While the dimmer module is compatible with:
· HV LED light sources (downstream phase cut-off: 5... 200 W; upstream phase cut-off: 5...20 W);
- Incandescent lamps / HV halogen lamps (trailing edge: 20...200W; leading edge: 20...150W);
- Electronic step-down converter for ultra-low voltage incandescent/halogen lamps (trailing edge: 5...200W; leading edge: 5...20W)
And cannot be used with fluorescent lamps/iron core transformer, incandescent lamps/low voltage halogen lamps/motors or heating installations.
4. Before purchase/installation:
- Look at how your switch is installed to make sure the hardwired wall switch module will work with the type of switch you have.
- For versions where a neutral cable is required for installation, we recommend checking your junction box in advance. If your wall box doesn't have a neutral cable, in some countries you might find another junction box in the ceiling, where the neutral cable is.
- No neutral cables available? Then choose one of the following options:
o For non-smart bulbs: Use a wired dimmer switch that works with or without a neutral cable or replace the bulb with Hue smart lights
o For smart bulbs: Use a battery-powered switch or dimmer rather than hardwired.
- Make sure that there is enough room in your electrical box for the hardwired wall switch module to fit in.
5. Installation Tips: (for all types)
- Turn off your circuit breaker
- Make sure no one turns the power back on during installation
- Cover live wires
- Take a photograph of the existing wiring
- Match the wiring positions as shown in the guide
- In the event that a wire is inserted into the wrong terminal of the module, there is a way to disconnect the wire from the terminal. Insert a screwdriver into the slot and press lightly to release the cable.
- Electrical appliances should only be installed and connected by electrically competent persons. Local regulations may prohibit working on electrical wires without professional intervention. Consult your local authorities or an electrician for advice.
- Start the Hue app or scan the QR code found on the product or in the manual. Then follow the instructions there for the integration. An explanatory video showing the step-by-step installation is also available. Once the wired installation is complete, you can return to the Hue app and continue with the setup.
6. Which product should you choose?
Choose the hardwired wall switch module if:
- You use Hue and other Zigbee smart lights
- You prefer a permanent hardwired installation, without the need to replace a battery in the future.
Choose the battery-powered wall switch module if:
- You use Hue and other Zigbee smart lights
- You don't have a neutral cable.
- You want a simpler installation
Choose the hardwired switch (On/Off or dimmer) if:
- You use non-smart lights and want to make your lights and switches smart
- You want Matter support or Bluetooth backup
- You want to control smart and non-smart lights together seamlessly in the Hue ecosystem, through a single app
7. Troubleshooting
If the device is inaccessible or not working:
- Check the installation steps
- Make sure the circuit breaker has been turned off before wiring and that it is turned back on after installation is complete
- Confirm that the cables are firmly embedded in the connectors
- Check the button activity in the Hue app:
Look in the affected room or in Settings > Devices > Switches. If the button presses are not displayed, it may be a wireless connection issue. - Check for third-party integrations:
Make sure that no third-party apps or partner integrations override your Hue settings. - Reset the device in the app:
Reset the device to reconfigure it without fully restarting it. - Remove and re-add the switch:
Remove the device from the Hue Bridge, then re-add and set it up as usual. - Confirm switch type:
Make sure the unit is configured as the correct type of switch (toggle or push-button). If not, delete it and re-enter it with the correct setting.
Battery Module Only
- Low battery alerts appear in the Hue app
- Accidental contact with the wire may cause flickering - normal during installation.
Hardwired switch only
- Flashing lights→ check bulb type, charging requirements, and compatibility
If you have any further questions, please contact our customer support team.
